因為洗電路板很麻煩,曬電路板又很容易失敗,原本是想 DIY 一台 PCB CNC 來協助製作電路板,但是 CNC PCB 的速度太慢了,但是看到 Dirk Herrendoerfer 先生製作的 PCB CNC-Plotter 計畫,驚為天人,所以想要開始製作這個工具。
https://github.com/dherrendoerfer/uCNC_controller/tree/master/Extras
*
http://www.youtube.com/watch?v=P0nTmpGKBTo&list=PLotvT33qzzfLRwgobtJN5hoL4Ef7nsFFY&index=6
簡介
uCNC_controller 是一個 g-code 解碼控制器的應用程式,它是用於 Arduino 的平台上。它解碼 g-code的命令並且從而去控制 unipolar 步進馬達(3)、一些數位輸出(2)、伺服馬達(1)。
照片
列印過程:
使用 eagle 畫好電路板
點選 cam job ,在 output 的 device 中,選擇 HPGL。在 pen 的 diameter 中,輸入0.4mm。
儲存
------------>--------------------------------------------
You need 2x ULN2003 or 2004, one 7805 regulator, two capacitors. The power regulator goes into the upper left. If you want to use the laser you also need a mosfet and a resistor. If someone is a master at eagle I would really love to have a component layer for the .brd?
| 5V版本 (Vin 7~12V) | 6~15V版本(Vin 12~20V) | 備註 | |
| ULN2003A x2 | ULN2004A x2 | ||
| 8x2 IC座 x2 | 8x2 IC座 x2 | ||
| LM7805 | LM78xx | 視馬達電壓選用 | |
| 100uF 16v電容x2 | 100uF 25v電容x2 | ||
| 杜邦(公)x很多 | 杜邦(公)x很多 | ||
| JST 5pin x3 | JST 5pin x3 | 5線步進馬達 | |
| Molex 2pin x1 | Molex 2pin x1 | 雷射雕刻供電 | |
| JUMMPER x2 | JUMMPER x2 |
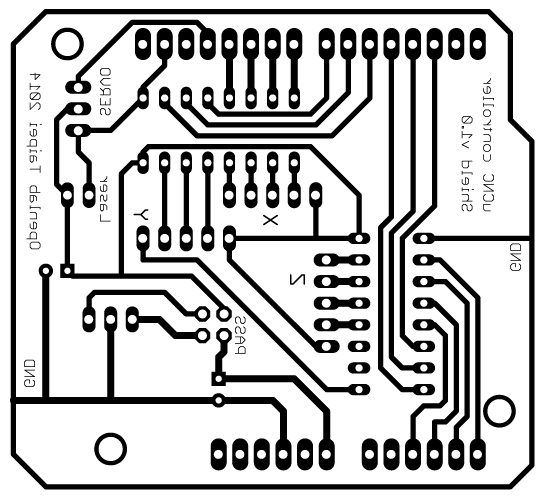
uCNC controller 電路板(UNO版)阿助設計。 PS: 還沒洗出來測試
&0:calibratePattern
&1: slackPattern
&2:slackPattern2
&99:輸出硬體設定
M150:設定 Z 軸模式
定義模式,透過可以寫程修改狀態的控制器,來如何使用步進馬達、伺服馬達和雷射驅動。
模式0:步進馬達 1 是 X 軸
步進馬達 2 是 Y 軸
步進馬達 3 是 Z 軸
伺服馬達是主軸轉速
雷射是由主軸驅動
模式1:步進馬達 1 是 X 軸
步進馬達 2 是 Y 軸
步進馬達 3 是 Y 軸
伺服馬達是 Z 軸 (down for Z<0)
雷射是 Z 軸 (on for Z<0)
模式2:步進馬達 1 是 X 軸
步進馬達 2 是 Y 軸
步進馬達 3 是 Y 軸
伺服馬達是 Z 軸 (+90 to -90)
雷射是由主軸驅動
模式3:步進馬達 1 是 X 軸
步進馬達 2 是 Y 軸
步進馬達 3 是 Y 軸
伺服馬達是工具
雷射是 Z 軸 (on for Z<0)
範例:
M150 S2 ;設定為模式 2
另一種獲得 nc g code 的方法,建立一個 Gerber 檔案,然後使用 gerber2gcode 得到。
hp2xx -m nc -t <input file>
NOTE: hp2xx must be compiled with nc support.?
尼龍線與馬達
The nylon is wound around the steppers 3 times - that is ok for the needed friction to move, but if you run into the ends, it won’t damage anything. If the stepper rod is too smooth you can apply a thin layer of plasticote or thin glue and let that dry completely. A touch up with a file or metal brush would also do the trick.?
檔案結構
問題
3d 列印零件改進

http://www.thingiverse.com/thing:725706

http://www.thingiverse.com/thing:950749

http://www.thingiverse.com/thing:18678
Enlarged Rostock Carriage V1.2 for 12mm smooth rod
檢討-2014-9-10
http://www.thingiverse.com/thing:24435
http://www.thingiverse.com/thing:5288
http://www.thingiverse.com/thing:3593
http://www.thingiverse.com/thing:47696
http://www.thingiverse.com/thing:10992 (彈簧)
http://www.thingiverse.com/thing:47696
http://www.thingiverse.com/thing:31983
http://www.thingiverse.com/thing:230152 (使用教學)
http://reprap.org/wiki/Plotting
結構
http://www.thingiverse.com/thing:182675
http://www.thingiverse.com/thing:30961
https://256.makerslocal.org/wiki/index.php/Makers_mantis_cnc
http://www.thingiverse.com/thing:6115
http://www.thingiverse.com/thing:344996
http://www.thingiverse.com/thing:945156
http://www.thingiverse.com/thing:18678
相似計畫
http://junkplusarduino.blogspot.tw/p/svg-image-plotter.html
http://www.instructables.com/id/X-Y-Plotter-1/
軟體
https://docs.google.com/file/d/0B1DQmCDF0I3kcUxraTJITWpPV0E/edit
硬體